The BladeRunner HeliQuad 2.4 is a delicate machine, before removing it from the packaging please read the instructions!
12
Welcome to the BladeRunner HeliQuad 2.4. The BladeRunner HeliQuad brings advanced, hobby-level 4-Channel
flying technology to beginner or advanced flyers who are looking for great performance from a Quadrotor Helicopter.
The BladeRunner HeliQuad has 32 bit MCU technology as well as a built-in advanced 3+3 gyroscope which provides
an ultra-smooth flight, and balance control assistance. A 3D (3 axis) accelerometer detects the flight condition during
operation. The 32 bit on-board microprocessor also provides continuous in-flight assistance for control comfort and
smooth actions. The BladeRunner HeliQuad operates indoors and outdoors on the 2.4 GHz frequency, allowing up to
6 units to fly in the same area within a 100' (30 Meters) range. The 2.4GHz Controller is a digital proportional radio,
therefore small movements in the Control Sticks produce precise control. Do not throw away this instruction manual
as it contains valuable information for the operation of your HeliQuad as well as warranty information. The helpful tips
in this pilot’s manual will improve your skills and enhance your experience. Look for these symbols for extra help.
Antenna
Safety Ring
Replacement
Rotors
Red / Green LED
USB connector
Pro / Regular
Mode Switch
Left Stick
Right Stick
Forward / Reverse
Movement Trim Pad
LED
This device complies with Part 15 of the FCC Rules. Operation is subject to the following two conditions:
1) This device may not cause harmful interference.
2) This device must accept any interference received including interference that may cause undesired operation.
Warning: Changes or modifications to this unit not expressly approved by the party responsible for compliance could void the user’s authority to operate the equipment. The manufacturer is
not responsible for any radio or TV interference caused by unauthorized modifications to this equipment. Such modifications could void the user’s authority to operate the equipment. Note:
This equipment has been tested and found to comply with the limits for a class B digital device, pursuant to Part 15 of the FCC Rules. These Limits are designed to provide reasonable
protection against harmful interference in a residential installation. This generates, uses and can radiate radio frequency energy and if not installed and used in accordance with the
instructions, may cause harmful interference to radio communications. However, there is no guarantee that interference will not occur in a particular installation. If this equipment does cause
harmful interference to radio or television reception, which can be determined by turn the equipment off and on, the user is encouraged to try and correct the interference by one or more of the
following measures: •Reorient or relocate the receiving antenna • Increase the separation between the equipment and receiver • Connect the equipment to an outlet on a circuit different from
that to which the receiver is connected • Consult the dealer or an experienced radio/TV technician for help.
IMPORTANT SAFETY INFORMATION
IMPORTANT BATTERY INFORMATION
FCC NOTE: U.S. ONLY
Lithium Polymer Rechargeable
Batteries must be recycled or
disposed of properly.
PLEASE! DO NOT RETURN THIS PRODUCT TO ANY RETAIL STORE!
For any questions or problems with this product please contact us at:Email: info@interactivetoy.com
Phone: Inside North America: +1-416-444-6873 Outside North America: 1-866-214-2220
Address: Interactive Toy Concepts, 17 Vulcan Street, Toronto, Ontario, Canada. M9W 1L3 Website: www.interactivetoy.com
Limited 30-day warranty
Product is warranted by Interactive Toy Concepts Limited against manufacturing defects in material
and workmanship under normal use for thirty (30) days from the date of purchase.
Warranty is validated upon receipt of proof or purchase and confirmation of UPC code.
Proof of Purchase
Industry Canada Notice: Canada only.
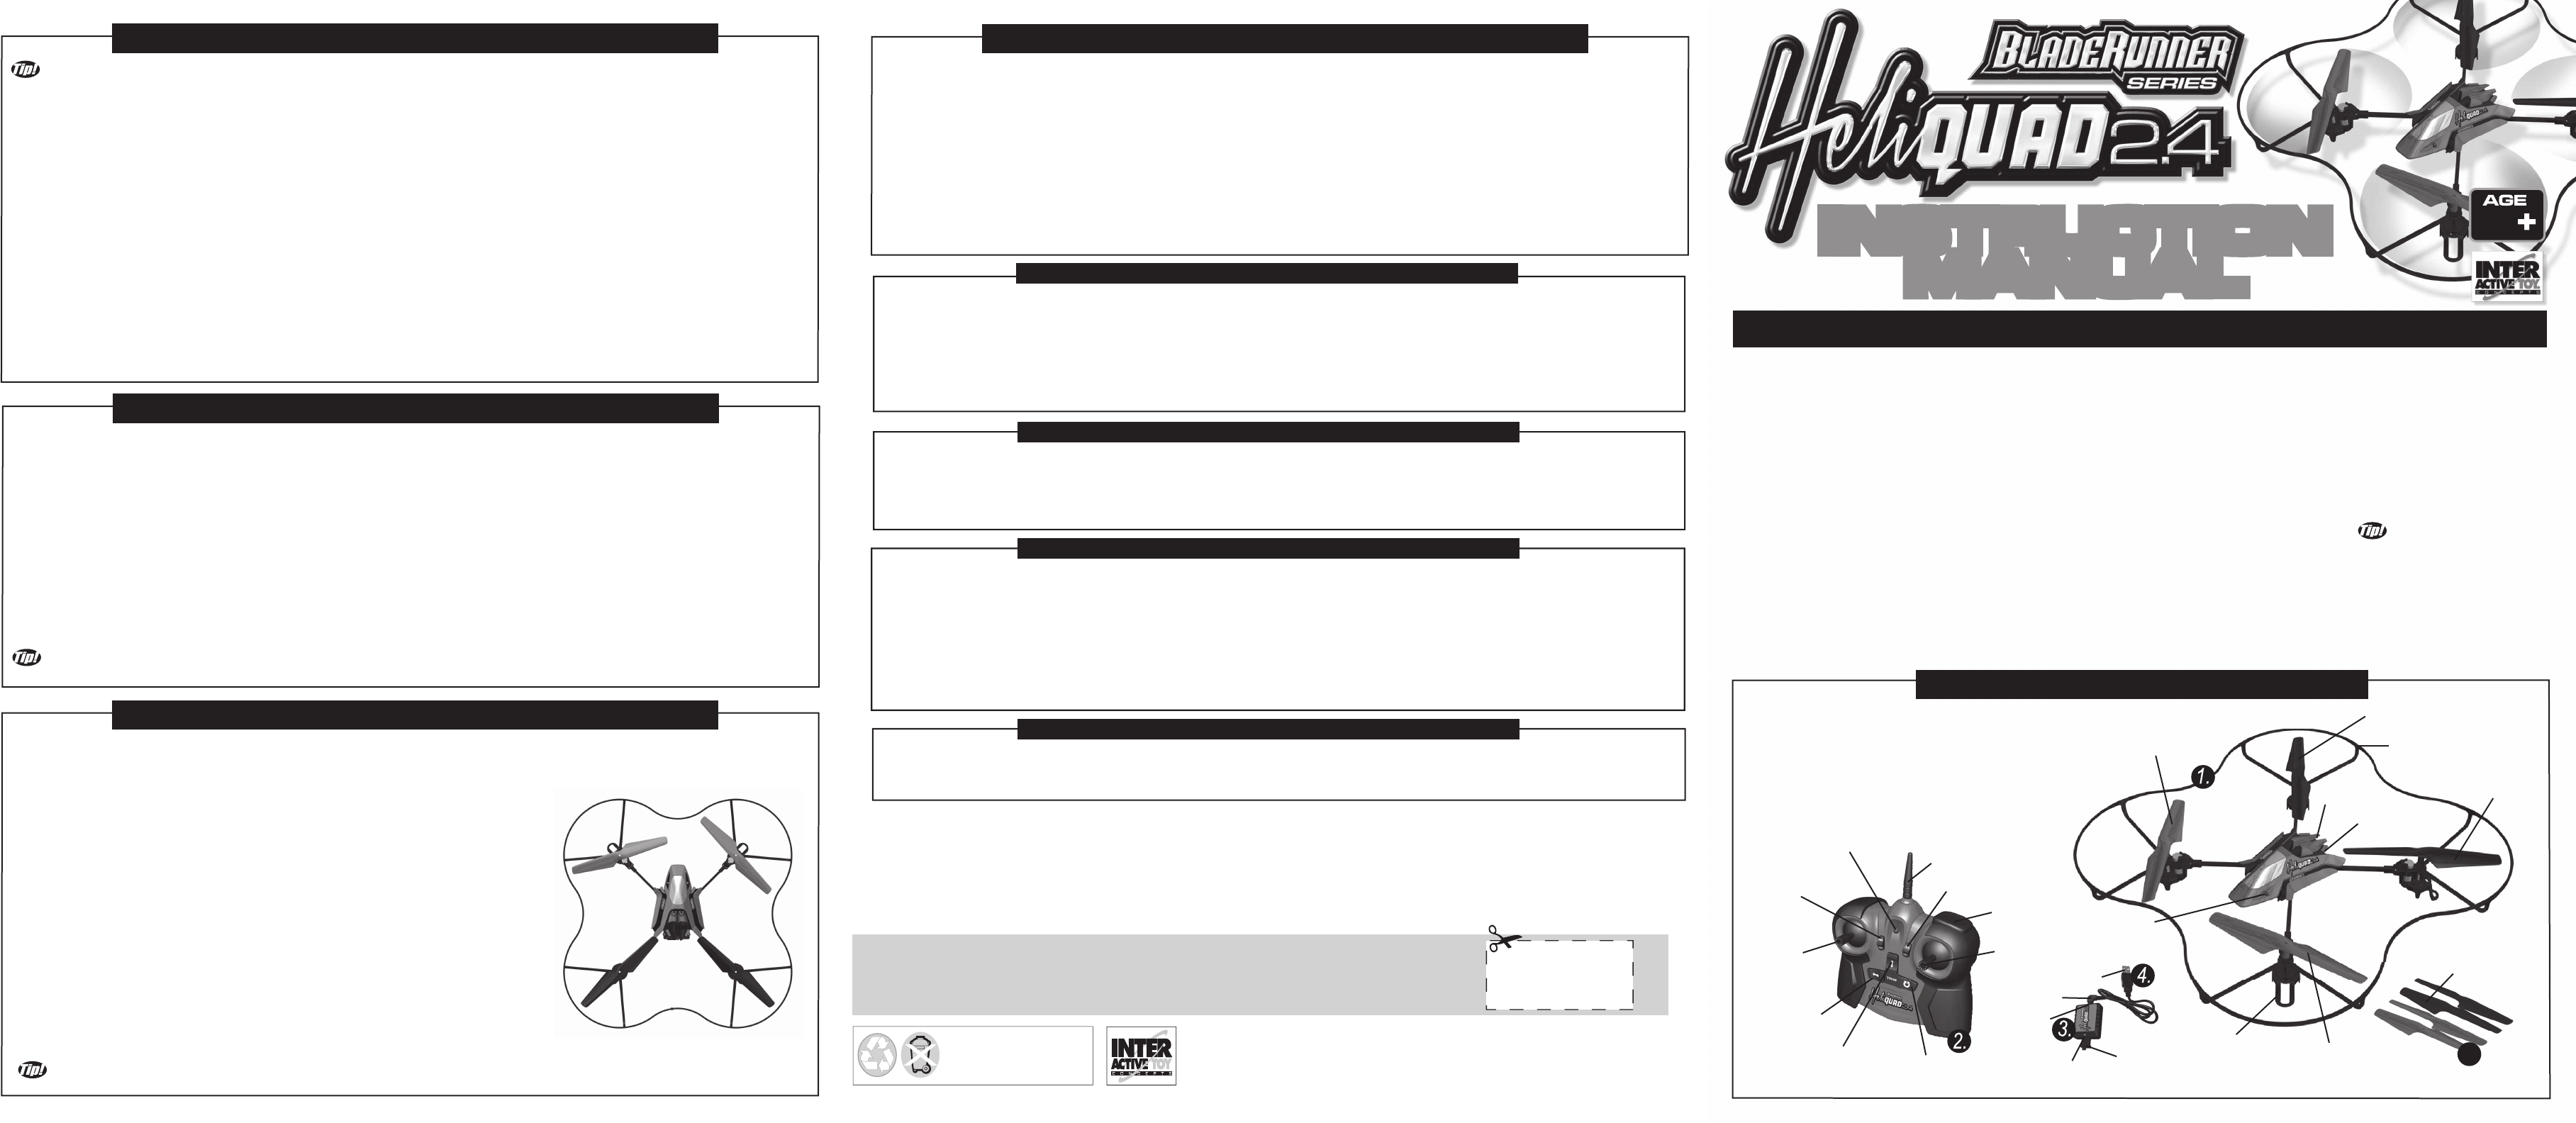
1. BladeRunner HeliQuad 2.4
2. 2.4 GHz Controller
3. Charger (for charging the HeliQuad only)
4. USB charging cable (for charging the HeliQuad only)
5. Instruction Manual
6. 4 Replacement Rotor Blades
Front Right
Red CCW Rotor
Rear Right
Black CW Rotor
INS-22033-130525-US
BladeRunner is a registered trademark of Interactive Toy Concepts © 2013 All Rights Reserved.
Manufactured by and distributed by Interactive Toy Concepts Ltd.
Conforms to Safety Standards ASTM F963-03 Regulatory Requirements.
Meets CPSC Safety Requirements.
Products and colors may vary. MADE IN CHINA.
UNPACKING YOUR BLADERUNNER HELIQUAD:
WARNING:The BladeRunner HeliQuad 2.4 is a delicate machine, before removing it from the packaging please read
the instructions! To prevent damage during shipping, the BladeRunner HeliQuad 2.4 is securely fastened in the
package. Please ensure that all of the tie-down and fastening locations are unfastened before attempting to remove
the BladeRunner HeliQuad 2.4 from the package. Be very careful when removing the BladeRunner HeliQuad 2.4 to
prevent damaging the helicopter.
PACKAGE CONTENTS:
This radio communication device complies with all the requirements of the Industry Canada Standard RSS-210. Operation is subject to the following two conditions:
1) This device may not cause harmful interference. 2) This device must accept any interference received, including interference that may cause undesired operation.
Field Strength and measurement distance: 2.4GHz - 89.15 dBuV/m at 3 meter.
Do not modify your Helicopter! Any changes or modifications to this product are strictly prohibited and will void product warranty. Do not attempt to charge the Helicopter from any other source
other than the AC charger provided to charge the Lithium Polymer Battery or you will void the warranty! Any attempts at charging other products with the AC charger are strictly prohibited and
will void the warranty! The Lithium Polymer Battery is permanently built-in to the Helicopter. Any attempts to tamper with or remove the Lithium Polymer Battery inside the Helicopter is stictly
prohibited and will void the warranty. Do not point the Antenna directly at the Helicopter! Do not use in strong winds, use only in VERY mild conditions! Do not use in rain, snow or around
heavy debris! Do not use near electrical lines or high voltage wires or other sources of electricity! Do not use around smoke or flames! Do not use around water and other liquids! Do not use in
crowded areas! Do not use around air conditioning! Do not use around air vents! Do not use around ceiling fans! Do not use around large obstacles! Do not use in very small spaces! Do be
conscious of changes in your area! Keep moving Rotors and Propellers away from eyes, hands, hair and loose clothing. Always turn off your Helicopter and Controller when not in use. Always
remove the batteries from the Controller during storage. Always use new and fresh Alkaline Batteries in Controller for optimal performance. Battery performance will greatly influence flight
characteristics. Keep your Instruction Manual in a safe place for future reference. Parental supervision required.
Do not mix old and new batteries, different types of batteries, standard carbon zinc, or alkaline batteries of different capacities. Do not use rechargeable batteries. Ensure that the contact
surfaces are clean and bright before installing new batteries. Please respect the correct polarity (-) or (+) when replacing batteries. Do not throw batteries into the fire. Replace all batteries of
the same type/brand at the same time. The supply terminals are not to be short-circuited. Exhausted batteries must be removed from the toy. Batteries should be replaced by adults. Remove
batteries if the toy is not going to be operated or store for a long time to prevent leakage or other damage. Non-rechargeable batteries are not to be recharged. Rechargeable batteries are
only to be charged under adult supervision. Rechargeable batteries are to be removed from the toy before being charged. Never leave a battery unattended while it is being charged. Never
leave a battery unattended in the presence of children. The Controller uses one 3 x AA Akaline type batteries(not included).
INSTRUCTION
MANUAL
INSTRUCTION
MANUAL
On / Off Switch
6.
Stunt Button
(Alt)
Front Left
Red CW Rotor
Rear Left Black
CCW Rotor
Input Port
Left / Right
Slide Trim Pad
Rotational
Trim Pad
Landing
Gear
2 Red LED
headlights
Output Jack
Output Jack
As the BladeRunner HeliQuad is flying towards you, you will naturally experience a phenomenon called “Control Reversal”.
This is normal and just takes a little practice to master. Below is a short list of the effects:
-Moving the right stick to the right will make the HeliQuad turn to your left.
-Moving the right stick to the left will make the HeliQuad turn to your right.
-Moving the left stick to the right will make the HeliQuad slide to your left.
-Moving the left stick to the left will make the HeliQuad slide to your right
5. To land your HeliQuad, gently and gradually move the Left Stick all the way down. This will slow the rotation of the 4 Rotors and the
HeliQuad will land. It is very important to NOT move the Left Stick all the way down suddenly, as the Rotors will stop spinning instantly
and the HeliQuad will fall and possibly sustain damage.
6 - A. To fly again, it may or may not be necessary to recharge your HeliQuad, depending on the charge that is remaining in the
HeliQuad’s internal Lithium-Polymer battery. Simply follow the steps described in the “CHARGING YOUR BLADERUNNER HELIQUAD
2.4” section above to recharge your HeliQuad.
6 - B. If you are finished playing, turn off the BladeRunner HeliQuad and 2.4 GHz Controller by sliding their respective On / Off Switches
to the off position.
FLYING YOUR BLADERUNNER HELIQUAD 2.4: (Continued)
The HeliQuad 2.4 is capable of performing stunts by flipping forward, backwards, or sideways 360º. To perform a flipping stunt follow the
next steps:
IMPORTANT: The HeliQuad 2.4 must be hovering with alttitude NOT LESS than 6.6’ (2 meters) from the
ground to perform stunt actions.
1. Press the Alt Button. The Controller's LED will flash rapidly. The Controller will also emit a rapid beeping sound.
2. Choose the stunt flip direction with the Right Stick as follows: -Flip to the right - Move the Right Stick to the right.
-Flip to the left - Move the Right Stick to the left.
-Flip forward - Move the Right Stick up.
-Flip backwards - Move the Right Stick down.
3. When the stunt is complete, the HeliQuad will hover normally. The Controller will stop beeping and its LED will light up continuously.
If you want to cancel the stunt after the Alt Button has been pressed, do not move the Right Stick. Just press the Alt Button again to
resume normal flight. The Controller's LED will stop flashing and the Controller will stop beeping.
ALT BUTTON - STUNT MODE:
In the event that any of your Rotor Blades sustain damage, they are easy to replace by following these steps. Note, there are 4 different
Rotor Blades on the HeliQuad. There is an extra set of all 4 blades included within your HeliQuad package.
Rotor Blade Replacement:
1. Locate the broken Rotor Blade and gently pull it upwards off of the axle shaft.
2. Note the color (red or black) of the Rotor Blade as well as the rotational direction indicator
(CW or CCW) at the bottom of the Rotor Blade. It is important that the correctly colored
Rotor Blade with the proper indicator is mounted on each axle shaft or the HeliQuad will not
fly correctly. The color helps to distinguish the frontal area of the HeliQuad from the rear
area when the unit is flying. The red Rotor Blades should be at the front, and the black Rotor
Blades should be at the rear of the HeliQuad. When looking at the HeliQuad from the top,
the correct layout pattern is as shown:
3. Install a new Rotor Blade in the same location on the rotor hub by sliding it on gently.
Your BladeRunner HeliQuad is ready to fly again.
TROUBLESHOOTING - If additional Rotor Blades are required or if Rotor Blade replace-
ment does not solve the your flying problem, visit www.interactivetoy.com.
There is a vast list of Troubleshooting tips for the BladeRunner HeliQuad on our website.
REPLACING DAMAGED ROTOR BLADES:
If you will be storing your BladeRunner HeliQuad for a longer period of time, remove the Batteries from the Controller. This will prolong
the operational life of the HeliQuad and the Batteries. It is a good idea to store the HeliQuad, Controller, Charger and USB Charging
Cable together so no components become misplaced or lost. Please respect the points listed below to extend the operational life of your
BladeRunner HeliQuad during storage.
1. Product may be damaged or performance may be adversely affected if your BladeRunner HeliQuad is not properly stored.
2. Never place any items on top of any components of the BladeRunner HeliQuad.
3. Always keep your BladeRunner HeliQuad in a cool dry place.
4. Keep BladeRunner HeliQuad away from pets and other household animals.
5. Do not rest your BladeRunner HeliQuad on any potential heat source such as electronic equipment or a radiator.
STORING YOUR BLADERUNNER HELIQUAD:
RED
RED
BLACK
BLACK
CW
CCW
CW
CCW
On/Off Switch
Charging Port
 (2 pages)
 Manymanuals.com
 Manymanuals.de
 Manymanuals.fr
 Manymanuals.it
 Manymanuals.pl
 Manymanuals.cz
 Manymanuals.es
 Manymanuals-pt.com
Commentaires sur ces manuels